
Azure Maps is a Microsoft technology that has a lot of cool features. Somewhat unexpectedly I discovered that along with purely mapping stuff it also provides functionality to acquire weather forecast data using REST API as outlined here. The detailed process is detailed in the video below, but I will highlight the key steps in this article as well.
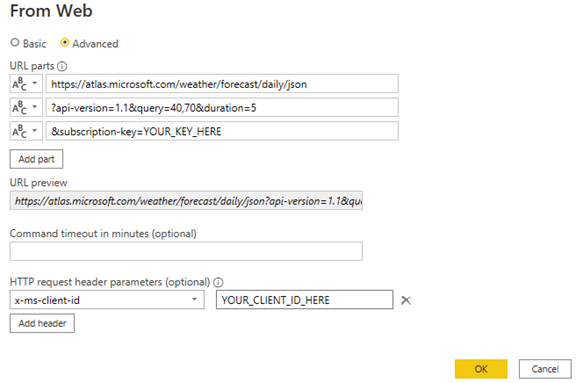
The first step in the process is to click on Transform data -> From Web and then fill in the required URL parts as shown below:
In order to find your Subscription Key and the Client ID, you should go to your Azure Maps resource in Azure portal, then click on  tab where you can find your Client ID and your Shared Keys (I used my Primary Key for the Subscription Key parameter). Here is the information printed out so you can cut and paste:
https://atlas.microsoft.com/weather/forecast/daily/json
?api-version=1.1&query=40,70&duration=5
&subscription-key=YOUR_KEY_HERE
Please note that I am hardcoding the latitude and longitude for the query parameter as 40 and 70 respectively, just to have the initial dataset loaded as we will be making changes to it later in the process. If your parameters were correct, then after you click on OK you should be able to see the weather forecast for this hard coded set of coordinates.

Now, if you are a seasoned power bi developer, this is probably all you need to get going. If you are not, then the next steps will be to convert this query into a Power Query function.
Again, the details are in the video above, so I will just provide a high-level flow of the next steps.
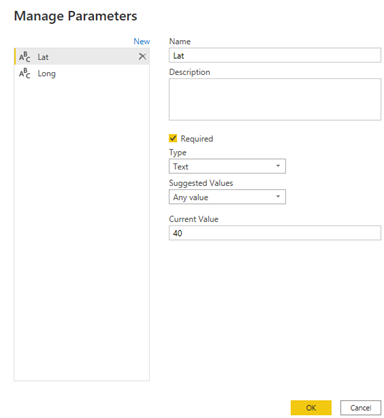
As the next step, let us create two power query parameters for Lat and Long:
Then you need to go to the Source step of our query and replace the hardcoded coordinates with our parameters (please see the highlighted parts below)
From:
= Json.Document(Web.Contents(“https://atlas.microsoft.com/weather/forecast/daily/json” & “?api-version=1.1&query=40,70&duration=5″ & “&subscription-key=YOUR_SUBSCRIPTION_KEY_HERE“, [Headers=[#”x-ms-client-id”=”YOUR_CLIENT_ID_HERE“]]))
To:
= Json.Document(Web.Contents(“https://atlas.microsoft.com/weather/forecast/daily/json” & “?api-version=1.1&query=“&Lat&”,”&Long&”&duration=5″ & “&subscription-key= YOUR_SUBSCRIPTION_KEY_HERE“, [Headers=[#”x-ms-client-id”=”YOUR_CLIENT_ID_HERE“]]))
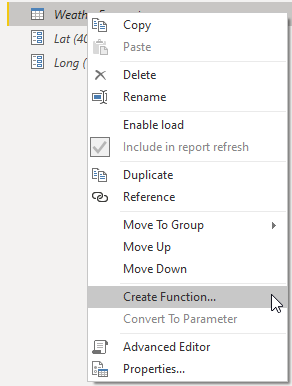
Now our query can be turned into a function by right clicking on it and selecting “Create Function”
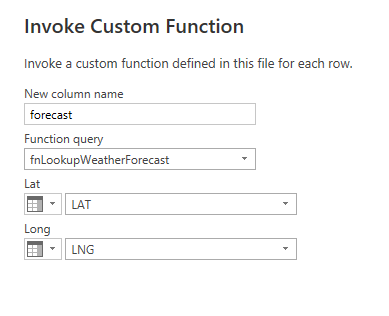
Now, if you have a list of US Zip codes with their respective Lat and Long information (for example you can get this list here: https://gist.githubusercontent.com/erichurst/7882666/raw/5bdc46db47d9515269ab12ed6fb2850377fd869e/US%2520Zip%2520Codes%2520from%25202013%2520Government%2520Data ) you can go to Add Column -> Invoke Custom Function to add Weather Forecast to our zip codes:
An that should be all you need to do to be able to add weather forecast data to your Power BI model.

Hi Andre,
I am interested in using your Powerbi PVM files for work but I cannot seem to get properly registered to access it in Teams.
I think it is due to company policy that I am unable to add your channel, can you help me by forwarding the files by email?
Please ping me on nishaun.sahmbi@magna.com
You are by far the best explainer on this topic, thanks for what you do
Care to explore breaking out FX variance embedded in Price variance in your perfect PVM model?https://www.fm-magazine.com/issues/2021/mar/bottom-up-sales-and-price-variance-analysis.html
Great explanation of a great feature; thanks!
Hi,
Thank you very much for this solution explanation.
I get an error when using it.
Formula.Firewall: Query ‘Lieferanten’ (step ‘Invoked Custom Function’) references other queries or steps, so it may not directly access a data source. Please rebuild this data combination.